No additional software is needed; even an amateur “IT” user can cut and edit video files using a built-in tool available in Windows XP.
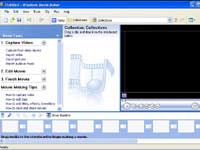
The Windows Movie Maker program will help you capture and edit great footage. You can start the program by navigating to Start -> Programs -> Accessories -> Windows Movie Maker.
Alternatively, you can go to Start -> Run… type: moviemk.exe and then press Enter.
To cut a movie file, follow these steps:
+ Step 1: Go to the File Menu -> Import into Collections… and provide the path to the video file you want. Windows Movie Maker supports various audio and video formats such as asf, au, avi, m1v, mp2, mp3, mpeg, wma, wmv…
+ Step 2: Drag and drop the file you wish to cut into the Storyboard/Timeline (located at the bottom of the program window).
 + Step 3: Click and drag from the starting position (the beginning of the cut) to the ending position (the end of the cut) of the segment you want to edit. Then press the Play button to preview the segment. If it doesn’t meet your expectations, you can use the Back button to redo it.
+ Step 4: Once you have cut the video segment to your satisfaction, if you want to save it, go to the File Menu -> Save Movie File.
For options when exporting the file, when the Save Movie window appears, click on Settings. You can choose the quality to be Low, Medium, or High (please note that the higher the quality, the larger the file size).
In the Display Information section, fill in the title (Title), author (Author), creation date (Date), description, and notes (Description)… After adjusting the settings, click OK and choose the file path to save it.
One point to note is that Windows Movie Maker only supports saving movie files in WMV format.
Quoc Trung


