In today’s reality, information security plays an essential role and is no longer a “secondary” concern in all activities related to the application of information technology. I want to highlight the immense role of IT application, which has been actively taking place, not merely as tools (Hardware, software), but has truly been viewed as a solution to many issues. Starting from the early 1990s, with a small number of IT experts, limited understanding, and modest applications of IT in production, transactions, and management, it remained at the tool level. Sometimes, I noticed that these “expensive” tools even posed certain obstacles and did not bring practical results for the organizations using them.
Those most “worried” often ask themselves, “What do we buy this equipment for?! It doesn’t produce a product, and it doesn’t significantly reduce paperwork. Have we wasted money?!” Nearby countries like Thailand and Singapore, strong economies in the region, recognized the superiority of IT applications early on. They have applied IT in all activities, not just in production, transactions, and management, but have brought IT to every home and every individual.
They have also mastered the skills to creatively manage and operate work using these modern “weapons.” Somewhere in the excerpt “The Road Ahead” by Bill Gates, he mentions the immense value of information in the 21st century, a true information age. This valuable “intangible” entity is gradually becoming a sought-after object, tightly controlled, and also serves as a launchpad for all countries wishing to develop strongly, quickly, and “sustainably.” Strong systems are needed to control information, create information, and effectively apply this information. The world is stepping into the 21st century using IT as a lever to guide activities, bringing people closer together, making geographical differences disappear, facilitating better understanding, and exchanging the most valuable and unique things.
Effective and “sustainable” application of information technology is the top criterion for many countries today, and Vietnam is no exception. From the perspective of a business applying IT in production, they also always wish to achieve this. Efficiency is essential, and “sustainability” is inevitable. From the viewpoint of a system security expert, when deploying an information system and establishing a strict and secure protection mechanism, it contributes to maintaining the “sustainability” of that enterprise’s information system. And we all understand that the value of information in a business is priceless. It is not only purely material; other immeasurable values like their reputation with customers will be affected if transaction information is stolen and then exploited for various purposes. Hacker, attacker, virus, worm, phishing—these concepts are no longer unfamiliar and are indeed top concerns for all information systems (PCs, Enterprise Networks, Internet, etc.). Therefore, all these systems need to be equipped with strong enough tools and understanding to cope with these terrifying dark forces. Who creates the strong firewall that can “burn” every malicious intent of intrusion?! The answer is primarily the awareness of safe computer use among all employees in an organization, the profound understanding of the Security Admins in that organization, and finally, the most effective tools serving this “war.” These include Firewalls, from Personal Firewalls protecting individual computers to Enterprise Firewalls capable of protecting the entire network system of an organization. And Microsoft ISA Server 2004 is one such Enterprise Firewall! A good product and a reliable friend to safeguard information systems.
CHAPTER 1: User Guide
CHAPTER 2: Installing Certificate Services
CHAPTER 3: Installing and Configuring Microsoft Internet Authentication Service
CHAPTER 4: Installing and Configuring Microsoft DHCP and WINS Server Service
CHAPTER 5: Configuring DNS and DHCP to Support Autodiscovery Features for Web Proxy and Firewall Client
CHAPTER 6: Installing and Configuring DNS Server with Caching-only Features on Perimeter Network
CHAPTER 7: Installing ISA Server 2004 on Windows Server 2003
CHAPTER 8: Backing Up and Restoring Firewall Configuration
CHAPTER 9: Simplifying Network Configuration with Network Templates
CHAPTER 10: Configuring Types of ISA Clients: SecureNAT, Web Proxy, and Firewall Client
CHAPTER 11: Configuring Policies on Firewall with ISA Server 2004 Access Policy
CHAPTER 12: Publishing Services on Perimeter Network to the Outside such as: Web, FTP Server
CHAPTER 13: Configuring Firewall to Act as SMTP Relay Filtering
CHAPTER 14: Publishing Exchange Outlook Web Access, SMTP Server, and POP3 Server Sites.
CHAPTER 15: Configuring VPN Server on ISA Server 2004
CHAPTER 16: Creating a Site to Site VPN on ISA Server 2004 Firewalls
CHAPTER 1: Deploying Network Infrastructure with Essential Services
The book is presented based on the practical deployment of ISA Server 2004 in the network model of an organization. The content encapsulates issues related to configuring the ISA Server 2004 system to become a strong firewall that still meets the requirements for remote service usage, serving both internal ISA Clients accessing external services (Internet) and external Clients (Internet Clients) needing to access services within the organization’s network.
Firewalls have always been one of the most complex types of network devices, and maintaining their operation to protect the network presents numerous challenges for security administrators. Basic knowledge of TCP/IP and network services is essential to understand how a firewall operates. However, it is not necessary to become a network infrastructure expert to use ISA Server 2004 as a network firewall.
This chapter will cover the following issues:
• Helping you understand the features available on ISA Server 2004
• Providing specific advice on using documentation to configure the ISA Server 2004 firewall
• Describing in detail the practical implementation (ISA Server 2004 Lab Configuration)
Understanding the Features on ISA Server 2004
ISA Server 2004 is designed to protect the network against external intrusions and control access from within an organization’s internal network. The ISA Server 2004 firewall accomplishes this through mechanisms that control what can be allowed through the firewall and what will be blocked. We can simply visualize it as follows: There is a rule imposed on the firewall that permits information to pass through; if this information is allowed, it will be “passed” through, and conversely, if there are no rules permitting this information to transmit, it will be blocked by the firewall.
ISA Server 2004 firewall contains many features that security administrators can use to ensure safe internet access and security for internal network resources. The book provides security administrators with an understanding of the general concepts and uses the most common and specific features on ISA Server 2004 through step-by-step guides.
Firewalls do not operate in a “vacuum” because we implement firewalls to protect something, which could be a PC, a server, or an entire network system with numerous services deployed, such as web, mail, database, etc.
We will provide a comprehensive guide on deploying the necessary services for the operation of an organization’s network, including how to install and configure these services. It is crucial that the network and services are configured correctly before deploying the firewall. This helps us avoid troublesome issues that may arise when implementing ISA Server 2004.
The network services and features on ISA Server 2004 to be installed and configured include:
• Installing and configuring Microsoft Certificate Services (the service providing digital certificates for secure identification during network transactions)
• Installing and configuring Microsoft Internet Authentication Services (RADIUS) for secure authentication for remote access through remote connections (Dial-up or VPN)
• Installing and configuring Microsoft DHCP Services (providing TCP/IP assignments for nodes on the network) and WINS Services (providing solutions for querying NETBIOS names of computers on the network)
• Configuring WPAD entries in DNS to support Autodiscovery and Autoconfiguration functions for web proxy and firewall clients. This greatly facilitates ISA clients (web and firewall clients) in an organization when they need to move computers from one network (with one ISA server) to another (with another ISA server) while still automatically detecting and working with the web proxy service and firewall service on this ISA server.
• Installing Microsoft DNS server on the perimeter network server (the network containing servers providing online services for external clients, located behind the firewall but also isolated from the LAN)
• Installing ISA Server 2004 firewall software
• Backing up and restoring the configuration information of the ISA Server 2004 firewall
• Using ISA Server 2004 templates to configure the firewall
• Configuring various types of ISA Server 2004 clients
• Creating access policies on the ISA Server 2004 firewall
• Publishing web server on a perimeter network
• Using ISA Server 2004 firewall as a spam filtering SMTP relay
• Publishing Microsoft Exchange Server services (Microsoft’s mail and collaboration system, similar to IBM’s Lotus Notes)
• Configuring ISA Server 2004 firewall as a VPN server
• Creating site-to-site VPN connections between two networks
Before practicing configuration of the ISA Server 2004 firewall, it must be clearly understood: This is a system designed to prevent attacks from the internet, and a misconfigured firewall can facilitate network intrusions. For these reasons, the most important concern for security administrators is how to configure the firewall to ensure safe internet access.
With its default configuration, ISA Server 2004 blocks all incoming and outgoing traffic through the firewall.
Clearly, this is the most proactive and safest configuration that an admin can confidently rely on from the outset when operating ISA Server. After that, to accommodate legitimate requests for access to various internet services (such as web, mail, chat, downloads, online games, etc.), security administrators will configure the ISA Server 2004 to meet the permitted requests.
Security administrators are always advised to conduct configuration tests of ISA Server 2004 in a lab before applying these configurations in a live environment. We will guide the correct and precise configuration of the ISA Server 2004 firewall through the user-friendly interface of ISA Server 2004. There may be mistakes made during the lab, but administrators need not worry because attackers cannot exploit these vulnerabilities (unless the lab network is connected to the internet). The most important thing in the lab is to understand the configured parameters correctly, allow for errors, and enable administrators to learn from these “mistakes.”
LAB Configuration Guide for ISA Server 2004 Firewall
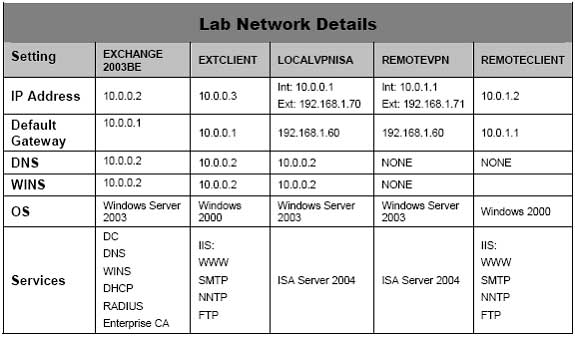
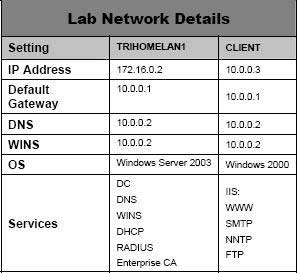
We will use a network lab to describe the capabilities and characteristics of ISA Server 2004. Administrators should build a test lab similar to the model illustrated below (using all specified parameters). If security administrators do not have enough real devices like this test lab, they can use simulated models from virtual software.
Microsoft’s Virtual PC software (or VMWare) is used to create a virtual Lab environment.
Learn more about Virtual PC at the website: http://www.microsoft.com/windowsxp/virtualpc/
In this section, we will cover:
• Configuration guide for ISA Server 2004
• Installation of Windows Server 2003, followed by promoting this computer to a Domain Controller (the server managing the entire Domain’s operations)
• Installation of Exchange Server 2003 on this Domain Controller and configuring it as an Outlook Web Access Site using basic authentication
Network diagram deploying ISA Server 2004
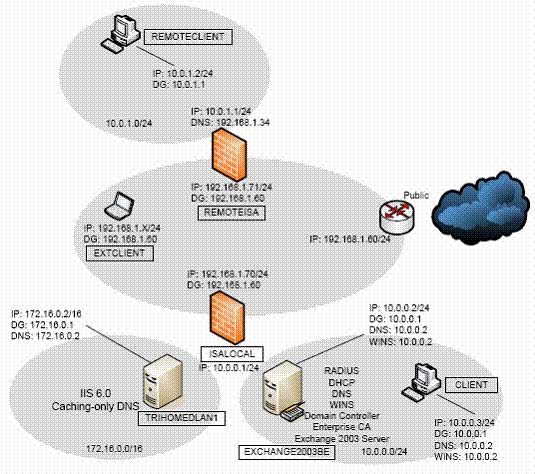
Network Lab Model – 7Computers.
However, the Network Lab does not require all 7 Computers to run simultaneously.
This makes it easier for the Lab, especially the virtual Lab.
This organization’s Network model consists of a Local Network (Local Area Network – LAN) and a Remote Network. Each Network has an ISA Server 2004 acting as a Firewall. All computers on the Local Network are members of the domain MSFirewall.org, which also includes the ISA Server 2004 Firewall computer. All other computers are not members of this domain.
In the lab Network, the External interfaces of the ISA Server 2004 Firewalls are connected to allow Internet access. Administrators should configure similar settings to test actual connections to the Internet from clients behind the ISA Server 2004 Firewalls.
If we are using emulation software, note that we must set up 3 Virtual Networks in the Test Lab. These are the Virtual Networks: Domain Controller on the Internal Network, TRIHOMELAN1 Computer on the Perimeter Network, and a REMOTECLIENT virtual Network.
Note for the virtual Lab: Ensure that the computers on these Virtual Networks are arranged on different Virtual Switches to prevent Ethernet broadcast traffic from overwhelming the network, which could lead to undesirable results in the virtual Lab.
Installing and Configuring the Domain Controller on the Internal Network
A computer different from the ISA Server 2004 Firewall computer, which has administrative power over the entire internal Domain, is the Domain Controller. Microsoft builds the Domain model under the control of Active Directory Service, and the Domain Controller is the tool for controlling that Domain (managing all Clients and Servers providing services in the Domain such as Web, Mail, Database servers, and even ISA Servers).
In this Lab, we will configure a Windows Server 2003 domain controller and also implement services such as DNS, WINS, DHCP, RADIUS, and Microsoft Exchange Server 2003 on this Domain Controller.
The following steps will be carried out:
• Install Windows Server 2003
• Install and configure DNS service
• Promote this computer to a Domain Controller
Installing Windows Server 2003
Follow these steps on the computer that will act as the Domain Controller:
1. Insert the installation CD into the CD-ROM, and restart the computer. Allow it to boot from the CD.
2. The Windows setup program will start loading the installation files. Press Enter when the Welcome to Setup screen appears.
3. Read the License terms on the Windows Licensing Agreement, use the PAGE DOWN key to scroll through, then press F8 to agree to the terms.
4. On the Windows Server 2003, Standard Edition Setup, the screen for creating logical partitions on the hard drive will appear. First, create a partition for installing the Operating System. In this Test Lab, the entire hard drive will be made a single partition. Press ENTER.
5. On the Windows Server 2003, Standard Edition Setup, select Format the partition using the NTFS file system. Press ENTER.
6. The Windows Setup program will format the hard drive; wait a few minutes for this process to complete.
7. The computer will automatically restart when the file copying process to the hard drive is completed.
8. The computer will restart in graphical interface mode. Click Next on the Regional and Language Options page.
9. On the Personalize Your Software page, enter your Name and Organization.
For example:
Name: Nis.com.vn
Organization: Network Information Security Vietnam
10. On the Product Key page, enter the 25-digit Product Key you have and click Next.
11. On the Licensing Modes page, select the correct option applicable to the Windows Server 2003 version you are installing. If you are installing the License in per server licensing mode, enter the number of connections that you have licensed. Click Next.
12. On the Computer Name and Administrator Password pages, enter the name of the computer in the Computer Name text box. Following the steps in this Test Lab setup, the Domain controller/Exchange Server on the same server is named EXCHANGE2003BE; this name should be entered in the Computer Name text box. Next, fill in the Administrator password and confirm the password in the Confirm password field (be sure to remember the administrator password, as you will not be able to log on to the server for subsequent activities without it). Click Next.
13. On the Date and Time Settings page, set the correct date, time, and time zone for Vietnam (if you are in Vietnam). Click Next.
14. On the Networking Settings page, select the Custom settings option.
15. On the Network Components page, select the Internet Protocol (TCP/IP) entry in the Components and click Properties.
16. In the Internet Protocol (TCP/IP) Properties dialog box, set the following parameters:
IP address: 10.0.0.2.
Subnet mask: 255.255.255.0.
Default gateway: 10.0.0.1 (note that this Default Gateway 10.0.0.1 is also the IP address of the Internal Card on the ISA Server).
Preferred DNS server: 10.0.0.2.
17. Click Advanced on the Internet Protocol (TCP/IP) Properties dialog box. In the Advanced TCP/IP Settings dialog box, click the WINS tab. On the WINS tab, click Add. In the TCP/IP WINS Server dialog box, enter 10.0.0.2 and click Add.
18. Click OK in the Advanced TCP/IP Settings dialog box.
19. Click OK in the Internet Protocol (TCP/IP) Properties dialog box.
20. Click Next on the Networking Components page.
21. Accept the default choice for the Network environment as Workgroup (we will create the Domain environment later, making this machine a Domain controller and also a member of the Domain, as this server has additional Server Services installed besides Active Directory Service). Click Next.
22. The installation process will continue, and when it reaches Finish, the Computer will automatically restart.
23. Log on for the first time to Windows Server 2003 using the password we created for the Administrator account during Setup.
24. The first page that appears on the screen is the Manage Your Server page; you should check the Don’t display this page at logon checkbox and close the window.
Installing and Configuring DNS
The next step is to install the Domain Naming System (DNS) server on this Computer (EXCHANGE2003BE). This is necessary because the Active Directory Service operates on the Domain Controller, controlling the entire Domain requires a DNS server service to handle name resolution requests, register records (A, PTR, SRV records, etc.). We will install the DNS server and then elevate this Computer’s role to that of a Domain Controller, and this DNS server will serve the entire Domain.
Follow these steps to install the DNS server:
1. Click Start, Control Panel. Click Add or Remove Programs.
2. In the Add or Remove Programs window, click Add/Remove Windows Components
3. In the Windows Components window, review the list of Components and click the Networking Services entry. Click Details.
4. Check the Domain Name System (DNS) checkbox and click OK.
5. Click Next in the Windows Components window.
6. Click Finish on the Completing the Windows Components Wizard.
7. Close the Add or Remove Programs window.
The DNS server has been installed, and the Admin needs to provide specific parameters for the DNS Server to facilitate name resolution operations, specifically creating two zones: Forward and Reverse lookup zones. Follow these steps to configure the DNS server:
1. Click Start and then click Administrative Tools. Click DNS
2. In the DNS workspace (DNS console), expand the server name (EXCHANGE2003BE), then click on Reverse Lookup Zones. Right-click on Reverse Lookup Zones and click New Zone.
3. Click Next on the Welcome to the New Zone Wizard.
4. On the Zone Type page, select the Primary zone option and click Next.
5. On the Reverse Lookup Zone Name page, select the Network ID option and enter 10.0.0 in the text box. Click Next.
6. Accept the default selection on the Zone File page, and click Next.
7. On the Dynamic Update page, select the Allow both nonsecure and secure dynamic updates option. Click Next.
8. Click Finish on the Completing the New Zone Wizard page.
Next, we will create a Forward Lookup Zone for the Domain that this Computer will serve as the Domain Controller.
Follow these steps:
1. Right-click on Forward Lookup Zone and click New Zone.
2. Click Next on the Welcome to the New Zone Wizard page.
3. On the Zone Type page, select the Primary zone option and click Next.
4. On the Zone Name page, enter the name of the forward lookup zone in the Zone name text box. In this example, the name of the zone is MSFirewall.org, which matches the name of the Domain to be created later. Enter MSFirewall.org into the text box. Click Next.
5. Accept the default settings on the Zone File page and click Next.
6. On the Dynamic Update page, select Allow both nonsecure and secure dynamic updates. Click Next.
7. Click Finish on the Completing the New Zone Wizard page.
8. Expand Forward Lookup Zones and click on the MSFirewall.org zone. Right-click on MSFirewall.org and click New Host (A).
9. In the New Host dialog box, enter EXCHANGE2003BE in the Name (uses parent domain name if blank) text box. In the IP address text box, enter 10.0.0.2. Check the Create associated pointer (PTR) record checkbox. Click Add Host. Click OK in the DNS dialog box confirming that the (A) Record has been created. Click Done in the New Host text box.
10. Right-click on the MSFirewall.org forward lookup zone and click Properties. Click on the Name Servers tab. Click on the exchange2003be entry and click Edit.
11. In the Server fully qualified domain name (FQDN) text box, enter the full name of the Domain Controller computer as exchange2003be.MSFirewall.org. Click Resolve. You will see the IP address of the Server appears in the IP address list. Click OK.
12. Click Apply and then click OK on the MSFirewall.org Properties dialog box.
13. Right-click on the DNS server name EXCHANGE2003BE, select All Tasks. Click Restart.
14. Close the DNS console.
Now this Computer is ready to elevate its role to become a Domain Controller in the Domain MSFirewall.org.
Follow these steps to create the Domain and elevate this server to be the first Domain Controller of the Domain (Primary Domain Controller).
Installing the Primary Domain Controller
1. Click Start and click Run.
2. In the Run dialog box, type dcpromo in the Open text box and click OK.
3. Click Next on the Welcome to the Active Directory Installation Wizard page.
4. Click Next on the Operating System Compatibility page.
5. On the Domain Controller Type page, select the Domain controller for a new domain option and click Next.
6. On the Create New Domain page, select the Domain in a new forest option and click Next.
7. On the New Domain Name page, enter the full name of the Domain (Full DNS name) MSFirewall.org in the text box and click Next.
8. On the NetBIOS Domain Name page (the NetBIOS name of the Domain to support older Windows OS like Windows NT and Windows 9x when these Clients want to interact with the Domain), accept the default NetBIOS name, which in this example is MSFIREWALL. Click Next.
9. Accept the default settings on the Database and Log Folders page and click Next.
10. On the Shared System Volume page, accept the default storage location and click Next.
11. On the DNS Registration Diagnostics page, select I will correct the problem later by configuring DNS manually (Advanced). Click Next.
12. On the Permissions page, select the Permissions compatible only with Windows 2000 or Windows Server 2003 operating system option. Click Next.
13. On the Directory Services Restore Mode Administrator Password page (this is the recovery mode for the Domain Controller when it encounters an issue; to access this troubleshooting mode when the DC is offline, restart the computer and select F8), enter the Restore Mode Password and then Confirm password. (Administrators should not confuse this password with the Domain Administrator Password, which controls the operation of DCs or the Domain). Click Next.
14. On the Summary page, click Next.
15. Now it’s time for the computer to restart to apply the settings just configured for Active Directory.
16. Click Finish on the Completing the Active Directory Installation Wizard page to complete the installation.
17. Click Restart Now on the Active Directory Installation Wizard page.
18. Log into the Domain Controller using the Administrator account after the restart.
Installing and Configuring Microsoft Exchange on the Domain Controller
The computer is ready for the installation of Microsoft Exchange. In this section, we will proceed with the following steps:
• Install the IIS World Wide Web, SMTP, and NNTP services.
• Install Microsoft Exchange Server 2003.
• Configure the Outlook Web Access Website.
Follow these steps to install the World Wide Web, SMTP, and NNTP services:
1. Click Start, select Control Panel. Click Add or Remove Programs.
2. In Add or Remove Programs, click Add/Remove Windows Components.
3. On the Windows Components page, select the Application Server entry in the Components page. Click Details.
4. In the Application Server dialog box, check the ASP.NET checkbox. Select the Internet Information Services (IIS) entry and click Details.
5. In the Internet Information Services (IIS) dialog box, check the NNTP Service checkbox. Also check the SMTP Service checkbox. Click OK.
6. Click OK in the Application Server dialog box.
7. Click Next on the Windows Components page.
8. Click OK in the Insert Disk dialog box.
9. In the Files Needed dialog box, provide the path to the I386 folder on the Windows Server 2003 installation CD in the copy file text box. Click OK.
10. Click Finish on the Completing the Windows Components Wizard page.
11. Close Add or Remove Programs.
Now proceed with the following steps to install Microsoft Exchange:
1. Insert the Exchange Server 2003 CD into the CD-ROM drive, on the autorun page, click the Exchange Deployment Tools link under the Deployment heading.
2. On the Welcome to the Exchange Server Deployment Tools page, click Deploy the first Exchange 2003 server link.
3. On the Deploy the First Exchange 2003 Server page, click New Exchange 2003 Installation link.
4. On the New Exchange 2003 Installation page, scroll to the bottom of the page. Click the Run Setup now link.
5. On the Welcome to the Microsoft Exchange Installation Wizard page, click Next.
6. On the License Agreement page, select the I agree option and click Next.
7. Accept the default settings on the Component Selection page and click Next.
8. Choose the Create a New Exchange Organization option on the Installation Type page and click Next.
9. Accept the default name in the Organization Name text box on the Organization Name page, and click Next.
10. On the Licensing Agreement page, select I agree that I have read and will be bound by the license agreement for this product and click Next.
11. On the Installation Summary page, click Next.
12. In the Microsoft Exchange Installation Wizard dialog box, click OK.
13. Click Finish on the Completing the Microsoft Exchange Wizard page when the installation is complete.
14. Close all open windows.
Exchange Server has been installed, and now the Admin can create mailboxes for Users. The next step is to configure the Outlook Web Access site and use only the Basic Authentication method. For Mail Server administrators, this is an important (but not mandatory) configuration when wanting to allow remote access to the OWA site. After that, we will request a Website Certificate for the OWA site and publish the OWA site using the Web Publishing Rule on the ISA Server. Through this rule, it will allow remote users to access the OWA site.
Follow these steps to configure the OWA site using the Basic Authentication method:
- Click Start, select Administrative Tools. Click Internet Information Services (IIS) Manager.
- In the Internet Information Services (IIS) Manager console, expand the server name, expand the WebSites node and open the Default Web Site.
- Click on the Public node, then right-click. Click Properties.
- In the Public Properties dialog box, click the Directory Security tab.
- On the Directory Security tab, click Edit in the Authentication and access control section.
- In the Authentication Methods dialog box, ensure that the Integrated Windows authentication checkbox is unchecked (removed). Click OK.
- Click Apply and click OK.
- Click on the Exchange node and right-click. Click Properties.
- In the Exchange Properties dialog box, click the Directory Security tab.
- On the Directory Security tab, click Edit in the Authentication and access control section.
- In the Authentication Methods dialog box, ensure that the Integrated Windows authentication checkbox is unchecked (removed). Click OK.
- Click Apply, then click OK in the Exchange Properties dialog box.
- Click on the ExchWeb node, then right-click. Click Properties.
- In the ExchWeb Properties dialog box, click the Directory Security tab.
- On the Directory Security tab, click Edit in the Authentication and access control section.
- In the Authentication Methods dialog box, uncheck (remove) the Enable anonymous access checkbox. Then check the Basic authentication checkbox (note that with this authentication method, the password is sent in clear text). Click Yes in the IIS Manager dialog box, and the Admin will receive a notification that the password is sent completely unencrypted (clear). In the Default domain text box, enter the name of the Internal Network domain, which is MSFIREWALL. Click OK.
- Click Apply in the ExchWeb Properties dialog box. Click OK in the Inheritance Overrides dialog box. Click OK in the ExchWeb Properties dialog box.
- Right-click on Default Web Site and click Stop. Right-click on Default Web Site again and click Start.
Conclusion:
In this guide to configuring ISA Server 2004, we have discussed the objectives and methods to effectively deploy and configure ISA. The guide also provides step-by-step troubleshooting methods. This first chapter focuses on building a Network Infrastructure based on Microsoft Active Directory Domain on a Windows Server 2003 Domain Controller and deploying other related Network services such as WINS, DNS, and enhanced services like Web and Mail. The next chapter will present how to install a Microsoft Certificate Services on the Domain Controller Computer.
(End of Chapter 1; please continue to follow Chapter 2, which will be released in the coming days)
Ho Viet Ha Owner
Network Information Security Vietnam, Inc.
http://nis.com.vn
Email: [email protected]


