CHAPTER 4: Installing and Configuring Microsoft DHCP and WINS Server Services
Windows Internet Name Service (WINS), when implemented in the Internal Network Domain, serves the computers in the network by resolving their NetBIOS names to each other. A computer A in this network can use the WINS server to resolve the NetBIOS name of computer B in another network (of course, the WINS system is typically used to resolve NetBIOS names within the organization’s internal network, to avoid confusion with how DNS servers resolve hostnames, which can resolve names in FQDN format (www.nis.com.vn) for the Internet or Internal Network Domain.
You can refer to my upcoming publication, “BUILDING NETWORK INFRASTRUCTURE ON MICROSOFT WINDOWS SERVER 2003,” for a better understanding of the role of a WINS server in the internal network.
Computers in the internal network will be configured as WINS clients, registering their NetBIOS/computer names with the WINS server. WINS clients can also send name query requests to the WINS server to resolve names into IP addresses. If there is no WINS server in the internal network, Windows clients will send broadcast messages to find the NetBIOS name of the computer they want to communicate with. However, if these computers are on a different network (with a different Network ID), these broadcasts will be blocked (the broadcast blocking function is default on routers). Therefore, in an organization’s internal network, which consists of multiple network segments, resolving NetBIOS names for computers from Network 1 to computers in Networks 2 and 3 using a WINS server is the ideal solution.
The WINS server is also particularly important for VPN clients. VPN clients do not directly connect to the internal network, and thus cannot use broadcasts to resolve NetBIOS names of computers within the internal network. (Unless you are using Windows Server 2003 and enable the NetBIOS proxy feature, which will support NetBIOS broadcasts, but with significant limitations). VPN clients rely on the WINS server to resolve NetBIOS names and use this information to find computers in the My Network Places of the internal network.
Dynamic Host Configuration Protocol (DHCP) is used to automatically provide IP address-related parameters (TCP/IP settings) for DHCP clients. The DHCP server will be configured on the internal network server and not on the ISA Server 2004 Firewall itself. Once we configure the DHCP server on the internal network, the ISA Server 2004 Firewall can automatically lease IP addresses from the DHCP server and redistribute them to VPN clients (these IP addresses are taken from a special address pool on the DHCP server; for example, the admin has created a DHCP scope named “VPN Clients Network,” which contains IP addresses and parameters specifically provided for VPN clients).
Access controls and routing relationships for these VPN clients to access the internal network can be configured between the VPN Clients Network and the internal networks defined in the Local Address Table (LAT) managed by the ISA Server 2004 Firewall.
In this section, we will install Microsoft WINS and DHCP services. Then, we will configure a DHCP scope with appropriate options.
Installing WINS Service
Windows Internet Name Service (WINS) is used to resolve NetBIOS names to IP addresses (simply because we are using the TCP/IP network, where communication is based on numbers—IP addresses—while computer names are merely a convenient way of establishing communication, as names are easier to remember than numbers). In modern network models today (for instance, Microsoft Windows 2000/2003 networks), DNS service is primarily used for name resolution, and the deployment of WINS service is an additional option, not mandatory. However, many organizations prefer to use My Network Places to identify servers on the network. We know that My Network Places searches for network computers based on the Windows Browser service. The Windows Browser service resolves names based on a broadcast-based service; if the network implements WINS, Windows Browser on computers will depend on the WINS server to gather information about computers distributed across various segments of the network. Additionally, WINS service is required when VPN clients want to obtain a list of computers in the internal network. The purpose of installing the WINS server in this guide is to support the resolution of NetBIOS names and the Windows Browser service for VPN clients.
Follow these steps to install WINS:
1. Click Start, Control Panel. Click Add or Remove Programs.
2. In Add or Remove Programs, click Add/Remove Windows Components.
3. On the Windows Components page, scroll down the list of Components and select Networking Services entry. Click Details.
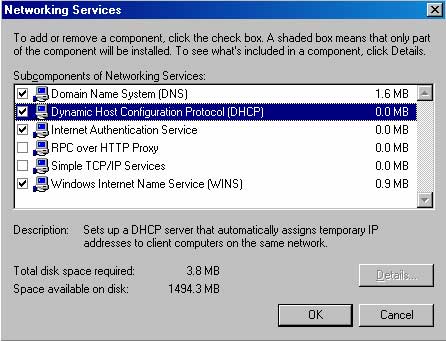
4. In the Network Services dialog box, check the Windows Internet Name Service (WINS) checkbox. Also check the Dynamic Host Configuration Protocol (DHCP) checkbox. Click OK.
5. Click Next on the Windows Components page.
6. Click OK in the Insert Disk dialog box. In the Files Needed dialog box, provide the path to the I386 folder in the Copy files from text box and click OK.
7. Click Finish on the Completing the Windows Components Wizard page.
8. Close Add or Remove Programs.
The WINS server is now ready to serve immediate registration of NetBIOS names without any additional configuration. The ISA Server 2004 Firewall, domain controller, and all internal network clients will be configured as WINS clients and will register with the WINS server in their TCP/IP settings.
Configuring DHCP Service
Dynamic Host Configuration Protocol (DHCP) is used to automatically allocate IP-related parameters
to internal network clients and VPN clients. In this lab, the main purpose of the DHCP server is to issue IP address parameters for VPN clients. Note that in the actual network model of organizations, computers should be configured as DHCP clients, rather than requesting a static IP address. (Of course, there are exceptions, such as using fixed IPs for servers, or in a network with a small number of computers where implementing a DHCP server could significantly increase costs, raising the Total Cost of Ownership – TCO.)
The DHCP server service has been installed according to the procedures outlined in Chapter 1. The next step is to configure a DHCP scope (a range of IP addresses, along with optional parameters – DHCP options). All these parameters will be provided to the DHCP clients.
Follow these steps to configure a DHCP scope:
1. Click Start, Administrative Tools. Click DHCP.
2. In the DHCP console, right-click the server name and click Authorize (to confirm that this DHCP server is legally operating in the domain; thus, all unauthorized DHCP servers will be disabled in providing IP addresses).
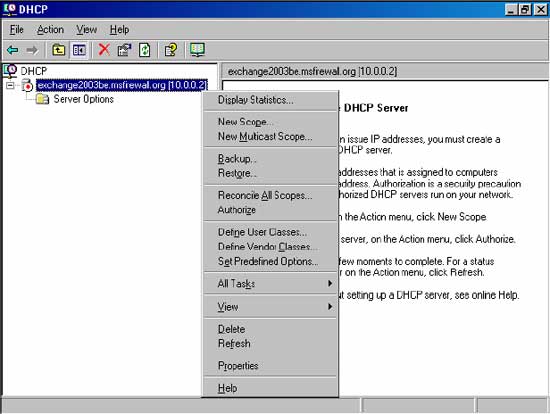
3. Click the Refresh button. You will notice the icon of the DHCP server change from red to green, indicating that DHCP is now active.

4. Right-click on the server name, click New Scope.
5. Click Next on the Welcome to the New Scope Wizard page.
6. On the Scope Name page, name the scope in the Name text box and provide a description in the Description text box. In this example, we will name the scope scope 1 and leave the description blank. Click Next.
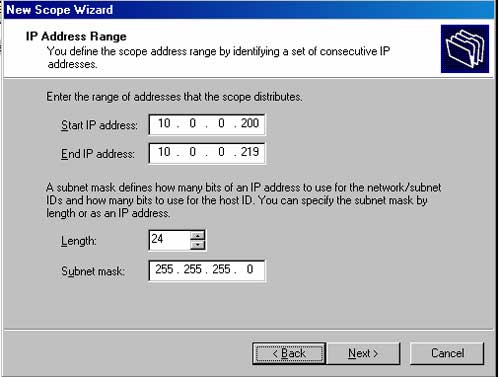
7. On the IP Address Range page, enter a starting IP address (Start IP address) and an ending IP address (End IP address) in the text boxes. This is the range of IP addresses you want to make available to DHCP Clients. In this example, we will set the Start address to 10.0.0.200 and the End address to 10.0.0.219. This range contains 20 IP addresses for DHCP clients. Subsequently, we will configure the ISA Server 2004 Firewall to allow VPN clients to establish up to 10 simultaneous VPN connections, and thus it may occupy up to 10 out of these 20 IP addresses for VPN clients. The ISA Server 2004 Firewall can request more than 10 IP addresses from the DHCP server if necessary. Next, we will enter the subnet mask in the text box Length or Subnet mask. For this example, we will confirm the value of 24 in the Length text box. The Subnet mask value will also automatically change once you fill in the value in Length. Click Next.
8. Do not specify any exclusions (reserved for future IP address needs or to avoid issuing IPs that are already in use on the network for devices such as Routers, Network Printers, etc.) on the Add Exclusions page. Click Next.
9. Accept the lease duration to be 8 days on the Lease Duration page. Click Next.
10. On the Configure DHCP Options page, select Yes, I want to configure these options now option and click Next.
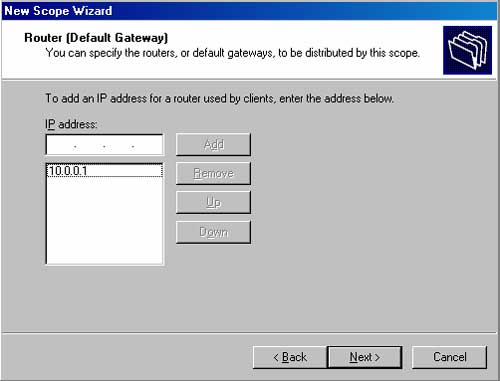
11. On the Router (Default Gateway) page, fill in the IP address of the internal interface (10.0.0.1) on the ISA Server 2004 Firewall computer in the IP address text box and click Add. Click Next.
12. On the Domain Name and DNS Servers page, enter the Domain name of the Internal Network in the Parent domain text box. This Domain name is used by the DHCP clients; based on this, these Clients will determine the Network environment in which they are operating. This will also facilitate Administrators later when configuring parameters like the wpad entry, which serves to enable Web Proxy and Firewall clients to automatically discover and work with Firewall Service or Web Proxy Service (two Services running on ISA Server 2004). This function is called Autodiscover. In this example, you will enter the Domain name MSFirewall.org in the text box. In the IP address text box, enter the IP address of the DNS server (10.0.0.2) on the Internal Network. Note that the domain controller is also the DNS server for the internal Network as identified in previous sections. Click Add. Click Next.

13. On the WINS Servers page, enter the IP address of the WINS server (10.0.0.2) and click Add.
14. On the Activate Scope page, select the Yes, I want to activate this scope now option and click Next.
15. Click Finish on the Completing the New Scope Wizard page.
16. In the DHCP console, expand the Scope 1 node and click on the Scope Options node. You will see the list of Options you just configured.

17. Close the DHCP console.
At this point, the DHCP server is ready to distribute IP address-related parameters to DHCP clients on the Internal Network, as well as VPN Clients belonging to the VPN clients Network. However, the ISA Server 2004 Firewall will not provide these IP parameters to VPN Clients until the Administrator has authorized the deployment of the VPN Service (VPN server) on the Firewall.
Conclusion:
In this chapter, we discussed the use of Microsoft WINS and DHCP servers, installed both Services on the Domain controller, and configured a DHCP Scope on the DHCP server. In the next section, we will discuss how these Services will support VPN clients.
Stay tuned for Chapter 5: Configuring DNS and DHCP to Support Autodiscovery for Web Proxy and Firewall Client which will be released soon.
Previous Chapter: CHAPTER 3: Installing and Configuring Microsoft Internet Authentication Service
Ho Viet Ha – Owner
Network Information Security Vietnam, Inc.
http://nis.com.vn
Email: [email protected]


