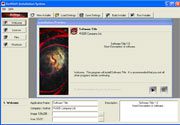
 With the RedShift Installation System, the program will help you create an installation package for your file directory in just 4 simple steps. The standout feature of the program is that, in addition to being user-friendly and free, it allows you to insert icons, wallpapers, titles, and licenses.
You can perform almost all basic and necessary operations with this program. Below is the sequence for creating an installation package with the RedShift Installation System.
Step 1 Welcome: Add a title in the Application Name, and enter your company or personal name in the Company/Author section. You can add a background image or icon in the corresponding Image and Icon fields. Next, select a brief description of the program in the Description section.
Step 2 License: This is the user commitment when using the software. You can copy a segment from other licenses to avoid misuse or misinterpretation.
Step 3 Files: Click on Choose Folder to select the path containing the files in the directory for which you want to create the installation package.
Step 4 Shortcuts: You can choose names and add extension tags for the accompanying installation package.
After completing these 4 basic steps, click Build Installer (Ctrl + F9) to start creating the installation package.
Now you have successfully created the installation package using the program. You can run the generated .exe installer to see your results.
The RedShift Installation System is completely free, with a size of 1679KB, and is compatible with all Windows versions. Download it at http://www.stormdance.net.
Pham Le Minh Dinh


