Typically, computer users rely on the “Print Screen” button to capture the current screen, subsequently using applications like Photoshop or ACDSee to extract the needed images. However, this method often does not yield high-quality results for the pictures.
If you frequently need to “capture” everything on your screen, it’s advisable to use a professional tool called “Super Screen Capture” (SSC). This tool allows for quick capturing of anything on the screen while maintaining a high quality of the captured images.
The Pro Edition of SSC offers a rich and user-friendly screen capture functionality. After installing and successfully activating the software, the main interface of SSC provides six primary screen capture features as follows:

1. The “Full Screen” function captures the entire screen, meaning it takes a snapshot of everything visible.
2. The “Window” function captures only the active application window. This feature is extremely useful for web editors who often need to capture images for illustration. The “Window” function minimizes the many “Crop” operations in Photoshop or ACDSee.
3. The “Scroll” function allows you to capture everything that has been framed on the screen. It can individually capture almost all details that are in a square format, such as windows, tables, and menu frames.
4. The “Shape” function enables you to capture a specific area on the screen using three formats: Rectangle, Ellipse, and Polygon. Click the down arrow next to the “Shape” button to select one of these three styles before clicking “Shape” to begin using it.
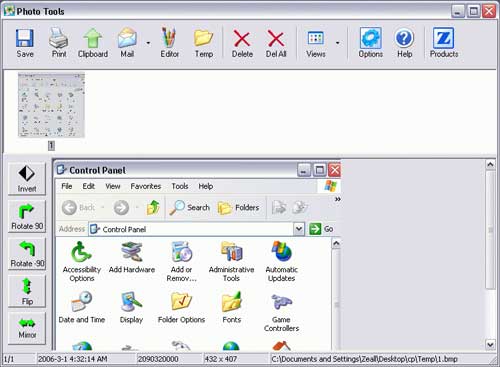
SSC immediately provides you with image exporting and editing features right after completing the capture process through the “output” interface. Here are some key functions of the “Output” interface:
– Click the “Save” button to save your capture in one of the four most popular image formats: BMP, JPG, PNG, and GIF.
– Click “Print” to print the captured image at the exact size it was taken.
– Click “Clipboard” to save the captured image to the clipboard.
– Click “Mail” to send the captured image immediately to designated email addresses.
– Click “Editor” to paste the captured image directly into Windows’ Paint application.
– Click “Tool” to edit the image instantly using SSC’s built-in editing tools. This is truly a versatile editing tool that includes all common image editing features such as cropping, adding text, resizing, rotating, mirroring, adjusting overall color, color correction, adding frames, and reviewing all captured images…
What sets SSC apart is its ability to capture Video and Audio, which truly elevates it to a “Pro” level.
5. Click the “Video” button to have SSC “record” all movies or video clips playing on the screen with sound and image quality nearly identical to the original footage. This feature is perfect for dealing with online video clips that are viewable but not downloadable. After clicking the “Video” button, a window dedicated to capturing will appear, allowing you to adjust it to fit the video window currently playing. Then, click the “Record” button to start recording. Click “Stop” to end the recording and “Save as” to export the recorded video to AVI format.
6. Click the “Audio” button to capture all sounds being produced by the computer. This feature alone can effectively replace any separate application designed for recording audio from a PC. Click the “Record” button to begin recording and “Save as” to export the recorded audio to WAV format.
You should go to “Option” to fine-tune all SSC features such as video compression quality, frame rate, audio quality, hotkeys for each feature, and storage directories…
Users can click here to download the trial version of Super Screen Capture 2.5, which has a file size of approximately 1.53 MB.
HOÀNG HẢI


